3D printing has changed the face of manufacturing and design. It enables makers to turn their ideas into physical objects with accuracy. From prototypes to final products, the possibilities are endless!
The magic of 3D printing is that it can transform digital designs into actual items. This happens through a process of depositing material in layers until the desired shape appears. Whether you are a hobbyist, an entrepreneur, or a professional designer, understanding this technology is essential to make the most of it.
To start 3D printing, you need to choose the right printer for your project. For example, FDM printers use thermoplastic filaments, while SLA printers use photopolymer resins.
Modeling software like Tinkercad and Fusion 360 can help create and modify designs. They provide user-friendly interfaces for experts and beginners.
It is also important to understand different printing materials. PLA, ABS, PETG are some common ones. Each material has its own characteristics, like strength, flexibility, and heat resistance. By experimenting with materials, you can achieve amazing results.
3D printing is a great opportunity to explore creativity and innovation. It is perfect for makers to bring their ideas to life and for entrepreneurs to find a cost-effective manufacturing solution. Unlock your creative potential in the world of 3D printing!
Understanding the Basics of 3D Printing
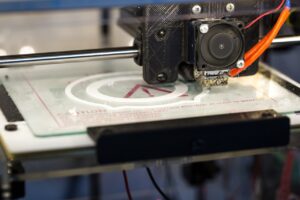
3D printing is a hugely popular technology these days. It turns digital designs into physical objects by layering materials. This process is called additive manufacturing and it offers unlimited possibilities!
To understand 3D printing, you need to learn about CAD (Computer-Aided Design). CAD software helps you create 3D models on a computer. You export these designs to a 3D printer in certain file formats like STL or OBJ. The printer reads the files and builds the object layer by layer.
When 3D printing, you must pick the right material. Different materials have different properties like strength, flexibility, or heat resistance. So, pick a material that suits your needs.
You also need to understand your printer’s settings and configurations. Each printer has its own parameters like temperature, print speed, or layer height. Experiment with these settings to get the best results.
Finally, you have to troubleshoot common issues during the printing process. Warping, stringing, or poor adhesion can happen due to incorrect print bed leveling or filament tension. Knowing these problems and solutions will help you get smooth prints.
Step-by-Step Guide to 3D Printing
Do you want to understand 3D printing? Here’s a concise guide to get you started.
- Design your model. Begin with CAD software. Make sure your design is optimized and meets any specific needs.
- Prepare for printing. Use slicing software to convert the model into layers and generate G-code. This code tells the printer how to move and extrude filament.
- Set up your printer. Calibrate and level the bed for optimal adhesion. Load filament and adjust settings like temperature and print speed.
- Start printing. Transfer the sliced model to your printer and initiate the print job. Monitor the process for filament flow, layer adhesion, and quality until completion.
Other considerations include choosing the type of printer (FDM, SLA, SLS), selecting materials (PLA, ABS, PETG), and adjusting parameters like layer height and infill density.
Now you understand the 3D printing process, let’s explore more possibilities. In one incredible case, a team in Australia used 3D printing to recreate an ancient artifact lost centuries ago. By scanning fragments from archaeological sites and combining them with modeling techniques, they made a detailed replica that matched historical records. This breakthrough not only provided insights into our past but also showed the potential of 3D printing in preserving cultural heritage.
As 3D printing becomes popular, stay informed and explore its applications. The step-by-step process in this guide helps unleash your creativity and unlock the potential of this technology. Start creating and witness the power of 3D printing!
Advanced Techniques and Tips for 3D Printing
Elevate your 3D printing skills with expert techniques and tips. Grab that filament and unlock the potential of this cutting-edge tech.
Check out the comprehensive table below for valuable info and practical advice to enhance your 3D printing process:
| Technique/Tips | Description |
|---|---|
| Layer Height | Adjust layer height for quality and speed. Experiment with different heights. |
| Print Temperature | Find optimal temp for filament. Tune this setting to combat stringing or warping. |
| Support Structures | Incorporate supports to ensure stability of complex designs during printing. |
| Cooling Settings | Control cooling settings to avoid defects like drooping or curling corners. |
| Filament Selection | Choose the right filament for strength, flexibility, and aesthetics. |
Discover more on post-processing techniques. Sanding, polishing, or painting can transform rough prototypes into professional-looking results.
Advanced slicing software unlocks potential by providing control over print parameters like infill density and print speed. This customizes resources while maximizing quality.
Explore multi-material 3D printers or resin-based printing methods to push the boundaries of what’s possible.
Enter the world of 3D printing mastery and unleash creative potential. Embrace these advanced techniques, experiment with software, and stay informed about emerging technologies. Start printing tomorrow’s possibilities today!
Safety Considerations and Best Practices for 3D Printing
3D printing is a revolutionary technology that has transformed manufacturing across various industries. To ensure a secure operation, safety considerations and best practices must be implemented.
- For starters, adequate ventilation is essential as it can reduce exposure to harmful fumes released during printing.
- Moreover, it is important to follow manufacturer guidelines and instructions such as recommended filament types, room temperature, and maximum print size. This can prevent accidents and enhance print quality.
- Furthermore, fire safety measures should be put in place to avoid electrical malfunctions or overheating components. Keeping a fire extinguisher nearby and avoiding flammable materials is recommended.
In addition to safety considerations, best practices should also be taken into account.
- Printer calibration is essential for precise and accurate prints. Bed leveling and extruder alignment should be adjusted accordingly.
- Managing workload is also important as it can prevent strain on the printer’s components. Breaking down larger projects into several smaller prints allows for better cooling.
- Good housekeeping habits should also be kept as cleaning up debris can prevent potential hazards. An organized workspace is also beneficial as it promotes productivity.
It is important to stay updated with the latest industry standards and recommendations for a fulfilling and secure 3D printing experience. Moreover, a study conducted by NIOSH indicated that 3D printing can emit ultrafine particles that may affect health if not properly controlled.
Conclusion and Resources for Further Learning
Our exploration of 3D printing is almost complete! We have examined the technology, its practical applications, and the fundamentals to bring your ideas to life. Now it’s time to reflect on what we’ve learned.
You now have the tools and knowledge to create with 3D printing. From basic troubleshooting to advanced design, you’re set to go! But, there is always more to learn. So, here are some resources you can use for further learning:
- Join online forums and communities dedicated to 3D printing.
- Watch tutorials and reviews on YouTube channels.
- Read manuals and books that focus on different aspects of 3D printing.
Learn with practice and these resources. With your growing skills, you can join the large 3D printing community and explore the amazing possibilities of this transformative technology.
Frequently Asked Questions
Q1: What is 3D printing?
A1: 3D printing is the process of creating a three-dimensional object by depositing layers of material through a computer-controlled machine, based on a digital design.
Q2: How does 3D printing work?
A2: 3D printing works by first creating a digital design using computer-aided design (CAD) software. The design is then sent to a 3D printer, which uses various methods such as extrusion or laser sintering to build the object layer by layer, using materials such as plastic, metal, or even food.
Q3: What types of objects can be created with 3D printing?
A3: 3D printing can be used to create a wide range of objects, including prototypes, spare parts, architectural models, jewelry, toys, and even prosthetic limbs. The possibilities are virtually endless, limited only by the imagination and the capabilities of the printer.
Q4: Are there any limitations to 3D printing?
A4: While 3D printing has revolutionized manufacturing and design, it does have a few limitations. These include the size of the objects that can be printed, the time it takes to print complex designs, and the cost of materials and printers. However, as technology advances, these limitations are continuously being overcome.
Q5: What are some common troubleshooting issues in 3D printing?
A5: Common troubleshooting issues in 3D printing include poor adhesion to the print bed, warping, clogged extruders, layer shifting, and failed prints. These issues can often be resolved through adjustments to printer settings, ensuring proper calibration, and using quality materials.
Q6: What are some safety considerations when using a 3D printer?
A6: When using a 3D printer, it is important to follow safety guidelines. This includes operating the printer in a well-ventilated area, using the appropriate materials and equipment, and being cautious of potential hazards such as high temperatures and moving parts. It is also recommended to have a fire extinguisher nearby as a precaution.