Ready to turn visions into reality? 3D printing is the revolutionary way to design and manufacture. Here, you’ll find step-by-step tutorials on how to use this innovative tech. Get a comprehensive understanding of the whole process with these guides. Troubleshoot common issues and learn expert tips to take designs to the next level. Join a community of passionate 3D designers and unlock a world of possibilities. Start this journey today!
Understanding 3D Printing
3D printing is a groundbreaking innovation in the tech world. It makes objects by adding material layer by layer. Knowing how it works unlocks a realm of possibilities for designers and engineers.
The potential of 3D printing is boundless. It can be used for prototypes and intricate designs, transforming industries. Comprehending the mechanics lets people bring their ideas to life.
3D printing has a special quality of creating complex shapes traditional manufacturing cannot. This means designers can explore and go beyond what was thought to be possible.
To make the most of 3D printing, three tips must be taken into account. First, recognize the limitations of your printer. Different printers have varying capabilities and resolutions, so pick one that suits the project. Second, adjust settings like layer height and infill density to ensure optimal quality and strength. Lastly, test and iterate throughout the design process.
Comprehending 3D printing intricacies gives rise to endless creative opportunities. Prototyping or detailed designs – this tech offers unmatched innovation. Follow these suggestions and embrace the power of 3D printing to witness ideas become reality.
Step 1: Choosing the Right 3D Printer
Choosing the right 3D printer? It’s essential to turn your ideas into reality! Here’s your guide:
- Assess your needs: Think about what you want to do. Look at print size, resolution, and material compatibility.
- Compare options: Check out printers on the market. Check features, user reviews, and prices.
- Look for reliability and customer support: Choose a brand with good reviews and good customer support. Check for any recurring issues or major maintenance needs.
- Set a budget: Decide on a budget range based on your requirements and ongoing expenses. Think about long-term costs like upgrades or repairs.
When choosing, consider the features needed for your project. Look for an easy-to-use interface and adjustable settings. Research each option and consider reliability and customer support to make an informed decision. This will help bring your designs to life!
Step 2: Designing the Object
Designing the object is key for 3D printing. You have to make a digital model of the object you want to print, which will be the base for the physical one.
To design it:
- Brainstorm and sketch ideas on paper or with design software. Think about purpose, functionality, and look.
- Pick CAD software that suits your needs and skill level. Look into options like SolidWorks, Autodesk Fusion 360, and Tinkercad. Get to know the interface and tools.
- Set up the workspace in the CAD software. Input exact measurements. Then, use tools like extrusions, rotations, and fillets to make the model in layers. Pay attention to details.
- Check the design for errors or areas to improve. Use the software’s visualization tools to have a look at different angles and perspectives. Change it until you’re happy.
You also need to know about wall thickness, support structures, and tolerances for interlocking parts. If you have problems, look online or ask experienced designers.
Tip: When designing objects that require assembly or interaction with other parts, consider how user-friendly it is. Provide clear instructions, with numbered labels or symbols, for easy printing and assembly.
Step 3: Preparing the Printer
To ready your 3D printer, these steps should be followed:
- Check settings. Ensure temperature and filament type are correct and adjust parameters as needed.
- Verify build plate level. This is very important, as an unlevel plate may cause issues with printing.
- Load filament. Insert according to manufacturer instructions and make sure it’s secure and fed through the extruder system.
When these steps are done, your printer is all set for 3D printing! Additionally, clean the print bed before each job to ensure material sticks to the platform.
Fun fact: A study from XYZprinting showed 77% of people experienced improved creativity and problem-solving skills when using 3D printers in education or work.
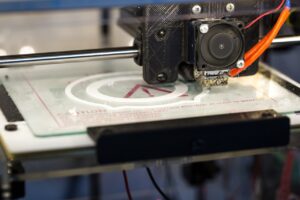
Step 4: Printing the Object
Bring designs to life with 3D printing technology! Here’s a 3-step guide to successful printing:
- Prep the Printer: Set up & calibrate your printer. Clean the build plate & make sure the filament is loaded.
- Configure: Use software like Cura or Simplify3D to adjust print settings.
- Start Printing: Send the file to the printer & let it finish creating the object layer by layer.
Note: Bigger & more complex objects take longer to print.
Fun Fact: 3D printing was first demonstrated in 1984 by Charles W Hull who filed a patent for his stereolithography apparatus (SLA).
Step 5: Post-Printing Process
Post-printing is a major part of 3D printing! Here are the tasks:
- Remove supports. Take your time and don’t damage the print.
- Smoothen out surfaces with sandpaper or other tools.
- Surface treatment – paint, varnish, coat, etc. for extra protection and look.
- Assemble (if needed) and secure parts correctly.
- Clean and inspect the object for any flaws.
Remember: post-printing may differ for different materials. Research material-specific guidelines for best results.
Take extra care while post-printing. It will give a professional touch to your design.
Now you know what to do after printing! Transform your design into reality with the right post-printing steps.
Conclusion
The journey to bring ideas to life with 3D printing is thrilling! Step-by-step tutorials make it easy. To master the skill requires patience, practice and learning. Tutorials provide guidance and tips to help enhance printing.
Technical considerations aside, creativity is crucial for 3D printing. It unleashes imagination, turning abstract ideas into realities. With artistic vision and innovative thinking, possibilities are limitless!
Fabbaloo’s article shows that 3D printing has transformed countless industries. Rapid prototyping and custom manufacturing are now possible!
Frequently Asked Questions
1. What software do I need to design 3D models for printing?
There are several options available for designing 3D models, such as AutoCAD, Fusion 360, SketchUp, and Tinkercad. These software programs allow you to create and modify 3D models to prepare them for 3D printing.
2. How do I choose the right 3D printer for my needs?
When choosing a 3D printer, consider factors like print volume, resolution, print speed, and material compatibility. Research different models, read reviews, and determine which features align with your requirements and budget.
3. What types of materials can be used for 3D printing?
Common materials for 3D printing include PLA, ABS, PETG, nylon, and resin. Each material has its own strengths and weaknesses, so consider factors like durability, flexibility, and heat resistance when selecting the appropriate material for your project.
4. How long does it take to 3D print an object?
The printing time depends on several factors, including the size, complexity, and layer height of the object, as well as the speed of your 3D printer. Small and simple objects may take a few hours, while larger and more intricate designs can take several days to complete.
5. Are there any post-processing steps required after 3D printing?
Yes, post-processing steps are often necessary to improve the appearance and functionality of the printed object. These steps can include removing support structures, sanding rough surfaces, and applying paint or coatings to achieve the desired finish.
6. What are some common challenges faced in 3D printing?
Some common challenges in 3D printing include print failures, warping, layer shifting, and filament clogging. These issues can be mitigated by ensuring proper printer calibration, using suitable support structures, adjusting printing temperatures, and maintaining optimal filament flow.